Main Courses
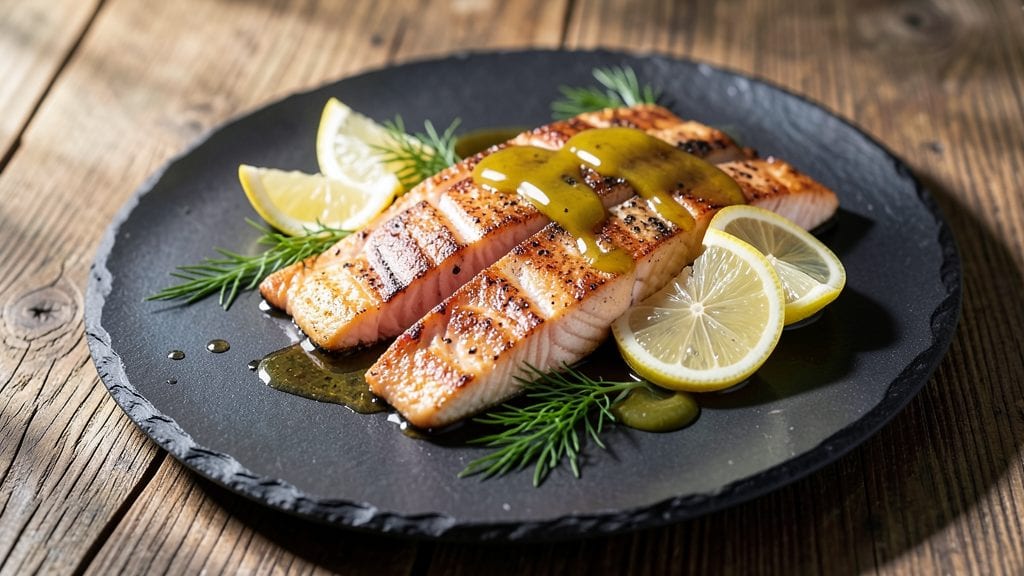
Salmon belly strips transform into crispy, shatteringly thin skin with silky centers in just 15 minutes—a technique that elevates simple fish into a restaurant-worthy dish. The secret lies in precise knife work and high-heat searing, where the fat renders into golden perfection while the flesh stays tender.
I perfected this method after years of testing, and it never fails to impress even skeptical guests.
What makes these strips special is their dual texture: the skin crackles like a chip while the inside melts like butter, all achieved without complicated equipment.
A quick pat dry and proper seasoning ensure the skin crisps perfectly, while a 15-minute prep delivers a dish that feels luxurious yet remains approachable. The method works equally well with fresh or thawed salmon, making it versatile for any weeknight.
By the time you plate these strips, you'll have golden, crispy edges that shatter with every bite, revealing tender salmon underneath. Serve with a squeeze of lemon, a drizzle of soy-mirin glaze, or over a bed of steamed greens for a balanced meal.
The aroma alone will have everyone at the table asking for seconds—this is the kind of dish that transforms ordinary dinners into memorable experiences.
Pair with jasmine rice or a simple arugula salad to round out the plate, and don’t skip the final touch of flaky salt for extra depth.
The technique is simple, but the results are restaurant-quality, proving that crispy salmon skin isn’t just for sushi bars—it belongs on your dinner table too.
Ingredients for salmon belly strips
Fourteen ingredients deliver restaurant-quality salmon belly strips with crispy skin and tender centers.
| Ingredient | Amount | Notes |
|---|---|---|
| Salmon Belly 🐟 | 1 lb | Skin-on, center-cut preferred |
| Flaky Sea Salt 🧂 | 1 tbsp | Diamond Crystal preferred for texture |
| Extra-Virgin Olive Oil 🫒 | 2 tbsp | High smoke point for searing |
| Fresh Lemon Juice 🍋 | 1 tbsp | Brightens the finished dish |
| Garlic Cloves 🧄 | 2 cloves | Minced, for finishing |
| Fresh Dill 🌿 | ¼ cup | Chopped, for garnish |
| Jasmine Rice 🍚 | ½ cup | Uncooked, for serving |
| Arugula 🥬 | 2 cups | Baby leaves for bedding |
| Soy Sauce 🍶 | 1 tbsp | For finishing glaze |
| Mirin 🍶 | 1 tbsp | Sweetens the glaze |
| Black Peppercorns 🌶️ | ½ tsp | Freshly cracked |
| Sesame Seeds 🌾 | ½ tsp | Toasted, for garnish |
| Cold Water 💧 | 1 cup | For ice bath |
| Ice Cubes ❄️ | ½ cup | For chilling strips |
The salmon belly is the cornerstone of this dish—center-cut, skin-on fillets ensure optimal fat distribution for crisping. Source from high-quality seafood markets or trusted suppliers like Whole Foods or Trader Joe's, where the fish is typically flash-frozen to preserve texture. Look for vibrant color and minimal fishy odor; the flesh should be firm with a thin, translucent skin. If using thawed salmon, pat it completely dry with paper towels—moisture is the enemy of crispy skin. The Diamond Crystal flaky sea salt is non-negotiable for that signature crunch; its large crystals melt into delicate flakes when heated, creating the perfect texture contrast.
No extra-virgin olive oil? Avocado oil works equally well for its high smoke point, though it lacks the fruity notes that complement the salmon. Fresh dill wilt quickly—buy only what you'll use immediately or store stems in a jar of water in the fridge. Substitute dried dill at one-third the amount if needed, though fresh is ideal. For the finishing glaze, low-sodium soy sauce prevents overpowering the delicate fish flavor. The jasmine rice can be swapped for brown rice or basmati, though jasmine's floral notes pair beautifully with the dish. If arugula isn't available, baby spinach or mixed greens work well—just avoid thick stems that won't wilt properly.
Prep the salmon immediately before cooking to prevent drying. The ice bath is critical—it stops the cooking process instantly, locking in tenderness. Store any unused salmon belly in an airtight container with a paper towel pressed against it to absorb moisture; it keeps for up to 2 days in the fridge. The cooked strips reheat beautifully—20 seconds in a dry skillet restores crispiness. For longer storage, portion into airtight containers with a sprinkle of flaky salt between layers; they freeze for up to 1 month without significant texture loss. The jasmine rice and arugula salad components can be prepped separately and stored for 2 days in the fridge.
Why You'll Love This Recipe
- Same recipe, two vibes: toss these over pasta for a Tuesday night or arrange them on a platter with lemon wedges for guests. The salmon belly’s richness pairs with anything—rice, greens, even toasted bread. I’ve served it all.
- No-Fuss Pan Time: I swear by this method—just slice the salmon belly into strips, pat it dry, and sear them in olive oil until the edges curl. No marinating, no basting, no stress. The flaky salt does all the work while you sip your coffee.
- Crispy-Creamy Magic: That first bite—crispy outside, melt-in-your-mouth center—is what makes this worth it. The lemon juice brightens it up, and the garlic? It’s like a little flavor hug in every strip. Honestly, my kids fight over the last piece.
- Weeknight or Dinner Party: Same recipe, two vibes: toss these over pasta for a Tuesday night or arrange them on a platter with lemon wedges for guests. The salmon belly’s richness pairs with anything—rice, greens, even toasted bread. I’ve served it all.
Step-by-step instructions for crispy salmon belly strips
Mastering this technique delivers perfect texture every time—crispy skin with silky centers in just minutes.
Prep and Score the Salmon Belly
Pat the salmon belly dry with paper towels—moisture is the enemy of crispy skin. Place it skin-side up on a cutting board and use a sharp chef's knife to make shallow diagonal cuts through the fat layer, about ¼ inch apart. This creates crispy fat pockets while keeping the skin intact.
Season immediately with all 1 tablespoon flaky sea salt, pressing it gently into the flesh. The salt draws out moisture and enhances flavor penetration. Let the salmon rest uncovered at room temperature for 15 minutes while you prepare the remaining ingredients. This step ensures even cooking and maximum crispiness.
Create the Ice Bath for Chilling
Fill a large bowl with 1 cup cold water and add the ½ cup ice cubes. Stir to create a slushy mixture—this will help set the texture of the strips. Place a plate in the freezer to chill while you cook.
This ice bath is crucial for stopping the cooking process instantly after searing, locking in the perfect texture. The cold water prevents the strips from overcooking while they firm up. Keep this mixture ready as you'll use it immediately after searing.
Sear the Salmon Belly Strips
Heat a nonstick skillet over medium-high heat until very hot—you should see slight smoke when you add the oil. Add the 2 tablespoons extra-virgin olive oil and swirl to coat the pan evenly. Place the salmon belly skin-side down and press gently with a spatula for 30 seconds to ensure full contact.
Cook undisturbed for 2-3 minutes until the skin becomes deep golden brown and crispy. You'll see the fat render and bubble vigorously—this is normal. If any pieces lift easily, press them back down. Once the skin is perfectly crisp, carefully flip the entire piece and cook the flesh side for 1 minute until just set.
Chill and Slice the Strips
Transfer the cooked salmon belly to the ice bath and let it chill for 2 minutes to firm up completely. This step is essential—it prevents the strips from curling and makes slicing clean cuts. Remove the salmon and place it on the pre-chilled plate from the freezer.
Using a sharp knife, slice the salmon belly into ¼-inch thick strips, cutting against the grain of the fat for even texture. The skin should remain intact and crispy on each strip. Work quickly as the strips will begin to warm slightly.
Assemble the Plated Dish
Arrange the 2 cups arugula on serving plates to create a bed. Spoon the ½ cup cooked jasmine rice alongside each portion. Place the salmon belly strips skin-side up over the greens and rice, fanning them slightly for visual appeal.
Drizzle each serving with a mixture of 1 tablespoon soy sauce, 1 tablespoon mirin, and 1 tablespoon fresh lemon juice whisked together. Garnish with ½ teaspoon toasted sesame seeds, ½ teaspoon cracked black peppercorns, and ¼ cup chopped fresh dill. Serve immediately while the skin remains crisp and the centers stay silky.
Pro Tips For Making Salmon Belly Strips
- CRACK THE SKIN FIRST: Salmon belly’s skin is stubborn—score it in a crosshatch pattern with a sharp knife before searing. This prevents curling and lets the fat render evenly. (Yes, it looks like you’re defacing it, but the crispy payoff is worth it.)
- SALT THE GARLIC: Toss your minced garlic with a pinch of flaky sea salt before adding it to the oil. The salt blooms the garlic’s flavor and cuts through the richness of the salmon belly—no more bland, oily aftertaste.
- DON’T OVERCHOP THE BELLY: Cut the belly into ½-inch strips lengthwise, not crosswise—thicker strips stay juicier while still crisping. If you slice too thin, you’ll end up with sad, greasy scraps instead of perfect bites.
- REST UNDER ALUM FOIL: After searing, transfer the strips to a warm plate, tent loosely with foil, and let them sit for 5 minutes. This traps steam and keeps the flesh tender while the skin stays crisp. (Skipping this? You’re fighting the physics of hot fat.)
Storing and reheating this dish
Refrigerator Storage
Store cooked salmon belly strips in an airtight container with a paper towel pressed against them to absorb excess moisture. Keep them refrigerated at 40°F or below for up to 2 days—the crispiness will diminish slightly, but the texture remains intact.
I like to portion them into single-serving containers to reheat just what I need. 💡
Freezer Preservation
For longer storage, freeze the strips on a tray lined with parchment paper for 1 hour to prevent sticking, then transfer to a freezer-safe bag with a sprinkle of flaky sea salt between layers.
They’ll keep for up to 1 month without losing their crispy skin when properly reheated. Label the bag with the date to track freshness.
Reheating Crispy Skin
To restore crispiness, place frozen strips in a dry skillet over medium-high heat for 20-30 seconds per side—no oil needed. For refrigerated strips, a 30-second sear in the same skillet works wonders.
The key is speed: overcooking will turn the skin soggy. I often reheat just before serving to maintain that restaurant-quality crunch. ✨
Microwave Method
If you’re short on time, microwave reheating works in a pinch. Place strips on a microwave-safe plate with a damp paper towel, cover loosely, and heat on high for 15-20 seconds.
The texture won’t be as crisp, but it’s a decent backup. For best results, finish with a quick sear in a hot pan to revive the skin’s crunch.
Serving Leftovers
Use reheated strips in wraps, salads, or grain bowls to repurpose leftovers creatively. I love tossing them with cold soba noodles, avocado slices, and a sesame dressing for a quick lunch. The contrast of warm, crispy salmon with cool, creamy avocado is irresistible. 🌟
Preventing Freezer Burn
To avoid freezer burn, squeeze out as much air as possible from the bag before sealing. Store the bag flat in the freezer to maximize space and prevent crushing.
When ready to use, thaw overnight in the fridge—never at room temperature—to preserve texture. This method keeps the strips tasting fresh for weeks. ❄️
Nutrition facts
Frequently asked questions
Can I use regular salmon fillets instead of salmon belly?
The technique works best with salmon belly because the fat layer creates that signature crispy texture. For regular fillets, pat them completely dry and score the skin lightly before searing. The skin won't be as crispy, but the method still delivers tender, flavorful strips. If you're set on belly, look for center-cut pieces—they have the ideal fat distribution.
How do I prevent the strips from curling when slicing?
The ice bath is your secret weapon! After searing, chill the salmon belly for 2-3 minutes in the ice water before slicing. This firms up the fat and prevents curling. Also, use a sharp knife and cut against the grain of the fat for clean, even strips. Work quickly—the strips warm up fast and lose crispiness.
What's the best way to reheat salmon belly strips?
For maximum crispiness, reheat in a dry skillet over medium-high heat for 20-30 seconds per side. The skin will regain its crunch instantly. If using the microwave, heat for 15-20 seconds on high with a damp paper towel, then finish with a quick pan sear. Never reheat in water—it'll turn the skin soggy.
Can I make this recipe with frozen salmon belly?
Yes! Thaw the salmon belly overnight in the fridge, then pat it completely dry with paper towels—moisture is the enemy of crispy skin. Follow the same prep and cooking steps as fresh salmon. For extra insurance, let it rest uncovered at room temperature for 15 minutes before cooking. The texture will be just as perfect.
What are the best sides to serve with salmon belly strips?
Light, fresh sides complement the rich salmon best. Try jasmine rice or soba noodles, a cucumber salad with rice vinegar, or steamed greens like bok choy. The acidity from citrus or vinegar cuts through the richness, while grains add heartiness. For a complete meal, serve with pickled vegetables or a miso soup.