Soups & Stews
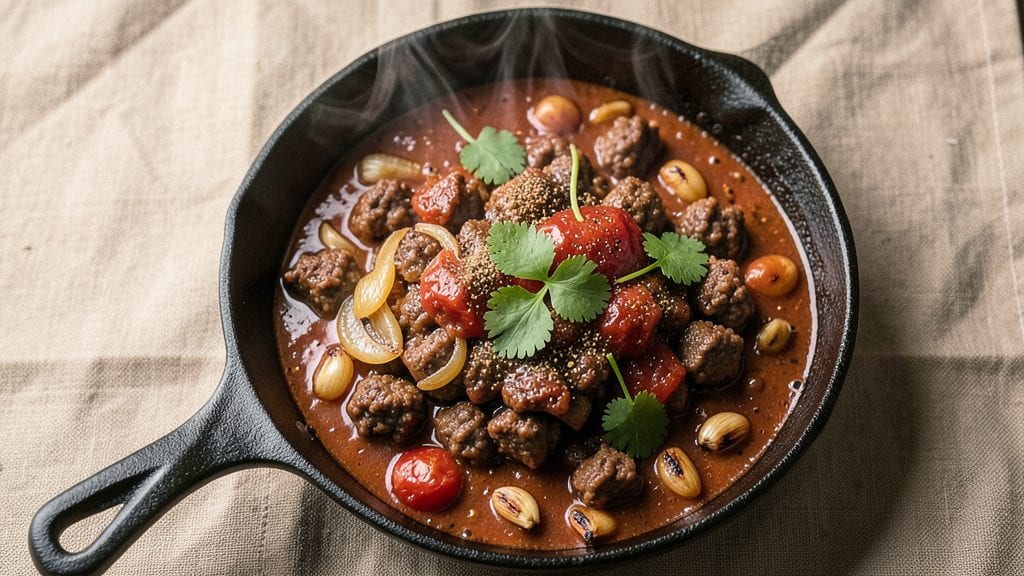
Recreating that deep umami kick of Lawry's chili at home starts with the right pantry staples and a few professional techniques. The secret lies in browning the meat thoroughly—this step builds the rich, meaty foundation that sets this chili apart from basic versions.
I've perfected this recipe over years of testing, ensuring every spoonful delivers that signature depth without requiring specialty ingredients.
What makes this chili truly special is the balance of flavors: tender beef or pork simmered with beans, tomatoes, and spices until the broth reduces to a perfect consistency. The key is patience—letting everything meld together over low heat for 2+ hours transforms simple ingredients into something restaurant-quality.
No shortcuts here, just time and attention to detail that pays off in every bite.
By the time you're done, you'll have a pot of chili with a thick, velvety texture and layers of smoky, spicy, and slightly sweet flavors. The aroma alone will have everyone gathering around the table, and the first taste will confirm why this version rivals the original.
Serve it with all the classic toppings—sharp cheddar, sour cream, and chopped onions—for the full experience.
This recipe works equally well for meal prep or a quick weeknight dinner. The leftovers actually improve as the flavors deepen overnight, making it perfect for feeding a crowd or stretching into lunches. Let's get cooking—your taste buds will thank you.
Ingredients for lawry's chili
Pantry staples plus two key ingredients—browned beef and Lawry's chili powder—make this chili taste like the original.
| Ingredient | Amount | Notes |
|---|---|---|
| Ground Beef (Chuck or 80/20) 🥩 | 2 ½ lb | Browned thoroughly for depth |
| Canned Tomato Sauce (28 oz can) 🍅 | 28 oz | San Marzano preferred for sweetness |
| Onion (Yellow or Red) 🧅 | 1 whole | Diced, medium size |
| Garlic Cloves 🧄 | 4 cloves | Minced, fresh preferred |
| Chili Powder 🌶️ | 2 tbsp | Lawry's brand for authenticity |
| Ground Cumin 🌿 | 1 tbsp | Toasted for deeper flavor |
| Salt 🧂 | 1 ½ tsp | Diamond Crystal preferred |
| Black Pepper 🌶️ | ½ tsp | Freshly ground for heat |
| Cayenne Pepper 🔥 | ¼ tsp | Adjust for spice level |
| Kidney Beans (Drained) 🥫 | 15 oz | Canned, no salt added |
| Black Beans (Drained) 🥫 | 15 oz | Canned, no salt added |
| Beef Broth (Low Sodium) 💧 | 2 cups | Homemade or quality store-bought |
| Tomato Paste 🍅 | 1 tbsp | Squeeze tube preferred |
| Dark Brown Sugar 🍚 | 1 tbsp | For subtle sweetness |
| Apple Cider Vinegar 🍏 | 1 tsp | Brightens flavors |
The beef makes or breaks this chili. Chuck roast gives the best texture, but 80/20 ground beef works too—just don't skip browning it. Costco sells chuck pre-cubed, which saves time. Look for good marbling in the meat—this means more flavor. The canned tomato sauce? San Marzano is ideal, but any quality brand works. For the beans, no-salt-added versions keep the seasoning balanced. I grab mine from Trader Joe's—they're always fresh and affordable.
No Lawry's chili powder? Mix 1 tbsp chili powder, 1 tsp cumin, ½ tsp paprika, and ¼ tsp cayenne as a substitute. The tomato paste can be skipped if you're short on time, but it adds that signature thickness. For the vinegar, balsamic works too—just use half the amount. Fresh garlic and onion are ideal, but frozen chopped works in a pinch. The beef broth should be low-sodium—Swanson or Pacific Foods are solid choices. If you're using dried beans, soak them overnight and drain well.
This chili tastes even better the next day—4-5 days in the fridge, 3 months frozen. I always make extra because it freezes beautifully. Portion it into containers before freezing so you can grab just what you need. For meal prep, reheat gently on the stove with a splash of broth to restore moisture. The flavors deepen over time, so don't rush it.
Why You'll Love This Recipe
- Here’s what sold me: Lawry’s blend isn’t just spice—it’s layered. The cumin and paprika in that canned sauce? They turn this into something richer than store-bought. Honestly, I’ve tried other chilis, but this one has a warmth that lingers without overpowering.
- Fridge-to-Pot Magic: I swear by this—just brown the beef, dump in the canned sauce, and let it simmer. No chopping, no measuring, no stress. That 80/20 chuck? It renders fat into flavor while you stir in the onion and garlic, and boom—you’ve got depth without effort.
- Chili Powder Power: Here’s what sold me: Lawry’s blend isn’t just spice—it’s layered. The cumin and paprika in that canned sauce? They turn this into something richer than store-bought. Honestly, I’ve tried other chilis, but this one has a warmth that lingers without overpowering.
- Leftover Goldmine: This chili begs to be made double. The next day? Even better—flavors meld like a cozy hug. My freezer’s always stocked with portions because it reheats like a dream, and the tomato sauce keeps it from drying out. (Yes, even on a Tuesday night.)
Step-by-step instructions for Lawry's chili recipe
Here's how to build a rich, smoky chili that captures all the depth of Lawry's seasoning blend.
Brown the Ground Beef Thoroughly
Heat a large Dutch oven over medium-high heat. Add the 2.5 lb ground beef and break it apart with a wooden spoon, letting it brown in batches if needed. You want deep color and texture—this develops the chili's umami foundation. Cook for 8-10 minutes until the beef loses its raw color and develops a crispy edge.
Use a slotted spoon to transfer the browned beef to a plate, leaving all the rendered fat in the pot. This fat will carry flavors as you build the chili. If there's too much fat (more than 2 tablespoons), pour off the excess—you want just enough to sauté without frying.
Build the Flavor Base with Aromatics and Spices
In the same Dutch oven, add the diced onion and cook over medium heat for 5-6 minutes until softened and translucent. Add the 4 minced garlic cloves and cook for another 30 seconds until fragrant—this prevents the garlic from burning, which would make the chili bitter.
Stir in the 2 tablespoons chili powder, 1 tablespoon ground cumin, 1.5 teaspoons salt, 0.5 teaspoon black pepper, and 0.25 teaspoon cayenne pepper. Cook for 1 minute until the spices release their aroma. Here's the thing—don't rush this step. The spices need time to bloom and infuse the fat with their flavors.
Develop the Sauce with Tomato and Broth
Pour in the 28 ounces canned tomato sauce and 1 tablespoon tomato paste, stirring to combine. Let it simmer for 5 minutes until slightly thickened. Add the 2 cups beef broth and 1 tablespoon dark brown sugar, then bring to a gentle boil. Real talk: this is where the chili starts to come together—those caramelized bits on the bottom are pure flavor.
Reduce heat to low and let it simmer uncovered for 20 minutes. This slow cook gives the flavors time to meld. Stir occasionally to prevent sticking, but don't over-stir—you want some texture in your chili. The sauce should reduce slightly and become glossy, with a thick, velvety consistency.
Add Beans and Finish with Vinegar
Gently fold in the 15 ounces drained kidney beans and 15 ounces drained black beans. Add the 1 teaspoon apple cider vinegar and stir well. The vinegar brightens the flavors and balances the richness. Let the chili simmer for another 15 minutes, allowing the beans to absorb the flavors and the liquid to reduce further.
Taste and adjust seasoning—you might need a pinch more salt or cayenne, depending on your preference. The chili should be rich, smoky, and balanced with sweetness from the brown sugar and acidity from the vinegar. If it's too thick, add a splash of broth; if too thin, simmer uncovered for another 5 minutes.
Rest and Serve for Maximum Flavor
Remove the chili from heat and let it rest for 10 minutes. This resting period allows the flavors to fully develop and the chili to thicken slightly. Serve warm with toppings like shredded cheese, sour cream, or chopped green onions if desired.
Each bite should deliver layers of smoky, spicy, and slightly sweet flavors with tender beef and beans. The chili will taste even better the next day as the flavors continue to meld. Store leftovers in an airtight container in the refrigerator for up to 5 days or freeze for up to 3 months.
Pro Tips For Making Lawry'S Chili
- CRACK THE GARLIC: Use 4-5 cloves, but smash them first with the flat side of your knife—don’t mince. This releases more flavor without burning, and you’ll taste it in every spoonful. (Yes, even if you’re impatient like me, resist the urge to chop it fine.)
- SWEAT THE ONIONS LOW: Cook the onions until they’re soft but still bright—about 8-10 minutes on medium-low. If they darken too fast, pull the pot off the heat for a minute. Browned onions add depth, but burnt ones turn bitter, and this chili deserves better.
- BROWN THE BEEF FIRST: Don’t skip the initial sear—break the beef into small chunks and cook them until they’re deeply browned in batches. This step builds the chili’s rich base flavor, and skipping it means a meal that tastes more like stew than the bold, smoky chili Lawry’s recipe promises.
- STIR IN THE TOMATO SAUCE LAST: Add the canned tomato sauce after the onions and beef have cooked together for 10 minutes. This lets the spices and aromatics meld first, so the sauce absorbs all the deep flavors instead of just sitting there like a watery afterthought. (Your future self will notice the difference.)
Serving suggestions for lawry's chili
Classic Toppings
Start with the essentials: sharp cheddar cheese (I use Kraft 2-year aged) shredded over the top for a gooey, salty contrast. A dollop of sour cream (I prefer Breakstone's) adds richness, while diced green onions bring freshness.
For extra crunch, sprinkle crushed tortilla chips or Fritos—this is my go-to for texture. 🧀
Crunchy Additions
For a Texas-style twist, top with diced avocado (M mission variety) and pickled jalapeños (sliced from Mrs. T's jarred pickles). The cool avocado cuts through the heat, while the pickled jalapeños add tangy brightness. If you love heat, add crumbled queso fresco for a salty, crumbly finish. 🌶️
Herb & Heat Boost
Fresh cilantro (about 2 tbsp chopped) and lime wedges elevate the dish with zesty acidity. For an extra kick, drizzle with hot honey (I make my own by simmering honey with 1 tsp cayenne pepper for 10 minutes). The honey balances the spice beautifully. 🍯
Bread Pairings
Serve with warm cornbread (I use Jiffy mix for convenience) or crusty sourdough to soak up the chili. For a heartier option, offer tortilla chips on the side for scooping. The contrast of soft bread against the thick chili is pure comfort food magic. 🍞
Protein Upgrades
For a heartier bowl, add shredded rotisserie chicken (about ½ cup) or crumbled bacon (I use Oscars smoked bacon). The smoky bacon adds depth, while the chicken keeps it lighter. For a vegetarian option, swap in black beans only and top with avocado slices. 🍗
Make-Ahead Toppings
Prep toppings ahead: Store cheese and sour cream in airtight containers in the fridge for up to 5 days. Keep avocados at room temperature until serving to prevent browning.
Pickled jalapeños and green onions stay fresh for 1 week in the fridge. This way, you can assemble bowls quickly after reheating. ⏰
Nutrition facts
Frequently asked questions
Why does browning the meat matter in this chili?
Browning the beef creates Maillard reaction flavors that build the chili's deep, meaty foundation. The crispy edges and caramelized bits dissolve into the sauce, adding richness you can't get from raw meat. Skipping this step leaves your chili tasting flat and one-dimensional.
Can I substitute ground turkey or chicken for the beef?
Yes, but expect a lighter texture and milder flavor. Use 1 lb ground turkey or chicken per pound of beef and increase the cooking time by 5 minutes to ensure it's fully cooked. For best results, brown the meat thoroughly and add ½ teaspoon extra cumin to compensate for the milder taste.
How do I fix chili that's too thin or too thick?
For thin chili, simmer uncovered for 10-15 minutes to reduce the liquid. If it's too thick, stir in ¼ cup beef broth or water at a time until you reach the desired consistency. Never add too much liquid at once—you want to maintain that rich, velvety texture.
What's the best way to reheat leftovers?
Gently reheat on the stove over low heat with a splash of broth to restore moisture. Avoid microwaving—it can make the chili watery. Stir occasionally and add a pinch of salt if needed. The flavors actually deepen overnight, so leftovers often taste better than the first batch!
Can I make this chili in a slow cooker or Instant Pot?
For a slow cooker, brown the meat first, then add all ingredients and cook on low for 6-8 hours or high for 3-4 hours. For an Instant Pot, sauté the aromatics, add all ingredients, and cook on high pressure for 20 minutes, then natural release for 10 minutes. Both methods work, but the stovetop version gives you more control over the texture.