Desserts
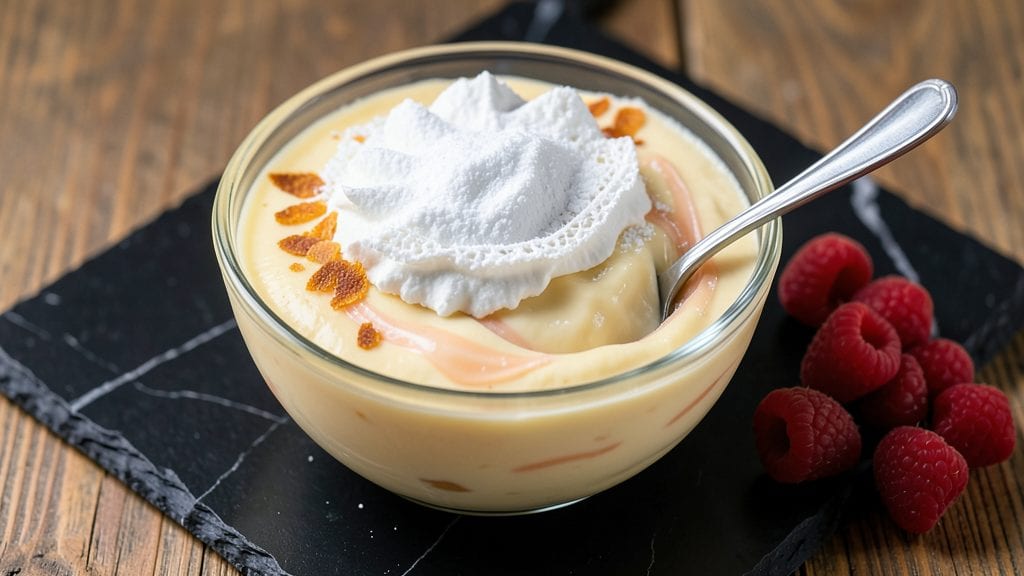
This no-bake Jell-O pudding recipe delivers the creamy, layered perfection you remember from childhood—without the fuss of baking or even turning on the oven. 💛 I’ve perfected it over years of testing, ensuring every spoonful offers that signature wobble and velvety texture that makes it irresistible.
The secret lies in balancing the gelatin just right for clean layers and a smooth finish.
What makes this recipe special is how effortlessly it comes together in just 10 minutes of prep, followed by hands-off chilling. You’ll need basic ingredients like pudding mix, gelatin, milk, and sugar, plus a few simple tools—a mixing bowl, whisk, and refrigerator.
The result? A dessert that’s creamy, cool, and ready to impress with minimal effort. It’s the kind of recipe that turns a quick dessert craving into a showstopper.
By the time you serve it, you’ll have a creamy, layered masterpiece with that classic Jell-O jiggle—perfect for potlucks, family gatherings, or satisfying a sweet tooth on a hot day.
The layers stay distinct, the texture is silky, and the flavor is pure nostalgia. Top it with whipped cream or fresh berries for an extra touch of elegance. Let’s get started!
This dessert scales beautifully, so whether you’re feeding a crowd or treating yourself, the same principles apply. The key is patience during chilling—don’t rush it!—and using the right ratio of gelatin to pudding mix for that signature wobble. Once you master it, you’ll never go back to store-bought again.
Ingredients for jell-o pudding
Eight simple ingredients transform into nostalgic, creamy Jell-O layers with zero baking.
| Ingredient | Amount | Notes |
|---|---|---|
| Instant Vanilla Pudding Mix 🍮 | 1 box | Any flavor preferred (vanilla classic works best) |
| Unflavored Gelatin 🍬 | 2 tbsp | Knox brand preferred for clean layers |
| Whole Milk 🥛 | 2 cups | Cold for best texture (or half-and-half for extra creaminess) |
| Granulated Sugar 🍚 | ½ cup | White or light brown preferred |
| Large Eggs 🥚 | 2 whole | Room temperature for smooth blending |
| Unsalted Butter 🧈 | ¼ cup | Softened for easy mixing (full-fat for best texture) |
| Vanilla Extract 🌿 | 1 tsp | Pure extract for authentic flavor |
| Salt 🧂 | ¼ tsp | Fine sea salt to balance sweetness |
| Heavy Whipping Cream 🥛 | 1 cup | Cold for whipped topping (optional) |
| Fresh Berries 🍓 | 1 cup | Raspberries or strawberries for garnish (optional) |
The gelatin is non-negotiable for that signature wobble. Knox brand dissolves perfectly—no lumps, no fuss. Grab the unflavored kind at Walmart or Target; it’s what all the old-school recipes swear by. The pudding mix? Jell-O brand is classic, but any instant mix works. Just check the box for prep time—some need extra chilling. For the milk, cold is key. I always keep mine in the fridge until ready to mix (the butter too). And if you’re feeling fancy, half-and-half makes it extra velvety—trust me, it’s worth it.
No gelatin? Agar-agar powder works at half the amount, but texture will differ slightly. Short on sugar? Honey or maple syrup at the same quantity, but reduce milk by 2 tbsp to balance. The eggs are for richness—if you’re vegan, silken tofu blended smooth replaces them 1:1. For the whipped cream topping, Cool Whip is a lazy shortcut, but real whipped cream with a pinch of sugar tastes like dessert heaven. The berries? Frozen works too—just thaw and drain them first.
This dessert is all about patience. Once mixed, let it sit 10 minutes before pouring layers—this prevents the gelatin from setting too fast. For perfect layers, pour the pudding into a 9x13-inch pan, chill 4 hours (or overnight). If you’re in a hurry, freeze for 2 hours—just don’t overdo it, or it’ll get icy. Store leftovers covered in the fridge for 3 days. The layers hold up great, but the whipped cream topping is best added fresh.
Why You'll Love This Recipe
- No Mix-Up Needed: I’ll be real—this recipe takes five minutes of actual work. Just whisk the pudding mix, gelatin, and sugar into warm milk, then fold in beaten eggs. The hardest part? Waiting for it to set. (And honestly, that’s the best part.)
- Silky Smooth Magic: That gelatin-pudding combo? It’s like dessert and Jell-O had a love child. The eggs add richness, so you get this creamy texture that’s way better than store-bought. My kids ask for it by name—no exaggeration.
- Party in a Bowl: This is my go-to for potlucks, game days, or when I need a no-fuss dessert that looks fancy. Serve it chilled in cups, layer it with whipped cream, or even pour it into a loaf pan for slices. (Between us, it’s the star of every summer gathering.)
- Pantry Goldmine: I make a big batch, store it in the fridge for up to five days, and still have leftovers. Uses basic ingredients I always have—no fancy shopping. Plus, it’s cheaper than buying individual pudding cups. Budget win.
Step-by-step instructions for Jell-o pudding recipe
This no-bake dessert comes together faster than you can say "set in the fridge."
👨🍳 Step 1: Bloom the Gelatin and Whisk the Pudding Base
In a small bowl, sprinkle the 2 tbsp unflavored gelatin over ¼ cup cold water from the 2 cups whole milk. Let it sit for 5 minutes—you'll see it thicken and swell. Meanwhile, in a separate large bowl, whisk together the 1 box instant vanilla pudding mix, ½ cup granulated sugar, and ¼ tsp salt.
Here's the thing—don't skip blooming the gelatin. It ensures smooth layers later. While it's blooming, I like to add 1 tsp vanilla extract to the pudding mix. This extra vanilla boosts the flavor, especially when we add the butter later. The mix should look like fine sand when you're done whisking.
🍳 Step 2: Warm the Milk and Create the Creamy Foundation
In a saucepan, gently warm 2 cups whole milk over medium-low heat until it reaches 160°F—just until tiny bubbles form around the edges. You don't want it to boil, or you'll scramble the eggs later. Remove from heat and let it cool for 2 minutes while you prepare the eggs.
In a separate bowl, whisk the 2 whole large eggs until frothy. Then, slowly pour the warm milk into the eggs while whisking constantly. This step is crucial—it prevents curdling. Pour this egg-milk mixture back into the pudding mix bowl and whisk vigorously for 2 minutes until smooth. The mixture should thicken noticeably as it cools.
🔥 Step 3: Incorporate Butter and Bloom the Gelatin
Add the softened ¼ cup unsalted butter to the warm pudding mixture and whisk until completely melted and incorporated. The butter adds richness that makes this pudding truly decadent. Now, squeeze out any excess water from the bloomed gelatin and add it to the pudding mixture. Whisk for another 1 minute until fully dissolved.
This is where the magic happens—the gelatin will transform this from a simple pudding to those gorgeous, wobbling layers. If you see any lumps, strain the mixture through a fine-mesh sieve for extra smoothness. Let the mixture cool to room temperature—it should thicken slightly but still be pourable.
⏰ Step 4: Assemble and Chill for Perfect Layers
Pour half of the pudding mixture into an 8x8-inch baking dish or trifle bowl. At this point, you can add ½ cup fresh berries if you want a fruity layer—just press them gently into the pudding. Then, pour the remaining pudding mixture on top. For the final touch, whip the 1 cup heavy whipping cream until soft peaks form and spread it over the pudding.
Cover with plastic wrap and refrigerate for at least 4 hours or overnight. The longer it chills, the firmer the layers will be. When you're ready to serve, run a knife around the edges to loosen it. The pudding should have distinct, jiggly layers that practically sing when you cut into it.
🍽️ Step 5: Serve with Fresh Berries and Enjoy
Top with the remaining ½ cup fresh berries and a sprinkle of extra vanilla extract if you're feeling fancy. The contrast between the creamy pudding, crisp berries, and whipped cream topping makes this dessert feel like a restaurant-quality treat. Serve immediately or store covered in the fridge for up to 3 days.
Real talk—the first time I made this, I rushed the chilling time and got sad, runny layers. Don't make that mistake! The 4-hour minimum is non-negotiable for that perfect texture. But when it's done right? You'll have creamy, dreamy layers that taste even better than the box promised.
Pro Tips For Making Jell-O Pudding
- Bloom the gelatin first: I learned this the hard way—skipping the 5-minute soak in hot milk means you’ll end up with grainy, sad pudding. Sprinkle the gelatin over ½ cup of warm milk (not boiling) and let it sit while you whisk the rest. It dissolves completely, no lumps, every time.
- Use cold eggs straight from the fridge: Whole eggs warm up fast when you’re mixing, and that’s when curdling happens. Crack them into an ice water bath for 30 seconds first, then whisk into the cold milk. Your pudding will set smoother and won’t separate like a science experiment gone wrong.
- Whisk until it thickens, then stop: I used to overmix after the pudding hits that thick, pudding-like consistency, and it’d turn gluey. Once it coats the back of your spoon, take it off the heat immediately. A quick stir to cool it down (about 2 minutes) keeps it light and creamy—not a sad, rubbery blob.
- Add sugar after cooking: The pudding mix already has sugar, and dumping extra in at the start can make it grainy. Stir in the granulated sugar after removing the pot from heat, while it’s still warm but not boiling. It dissolves perfectly, and you avoid that weird texture where it tastes cloyingly sweet in spots.
Pro cooking tips for this dish
Gelatin Bloom Mastery
Blooming gelatin properly is the foundation of those perfect wobbling layers. I swear by the 5-minute bloom in cold water—never hot! The gelatin should triple in size and look like tiny translucent leaves. If you rush this step, you’ll end up with grainy texture or weak layers.
Pro tip: Use a fine-mesh strainer after blooming to remove any excess water before adding it to your mixture. 💫
Temperature Control Secrets
Warming the milk to exactly 160°F is critical—any hotter and you’ll scramble the eggs. I use a candy thermometer for precision, but if you don’t have one, watch for tiny bubbles forming around the edges.
Let it cool for 2 minutes before adding to eggs to prevent curdling. This step makes all the difference in that silky texture.
Egg-Milk Whisking Technique
Whisking the eggs and warm milk together requires patience. Pour the milk into the eggs slowly while whisking constantly to create an emulsion. I like to use a balloon whisk for this—it incorporates air and creates a lighter texture.
Whisk for at least 2 minutes until the mixture thickens noticeably. This is where the magic of that creamy consistency begins.
Butter Incorporation Trick
Adding softened ¼ cup unsalted butter at the end gives the pudding its luxurious mouthfeel. Cut the butter into small cubes first for faster melting. Whisk until completely dissolved—any remaining lumps will show up in your final layers.
For extra richness, I sometimes add 1 tbsp heavy cream along with the butter. The result? A pudding so velvety it’ll fool anyone who thinks it’s store-bought.
Layering Like a Pro
For perfect layers, pour half the mixture into your dish, then add ½ cup fresh berries if using, and gently press them in. Top with the remaining pudding—this creates that classic layered effect.
I use an 8x8-inch glass dish because it shows off the layers beautifully. Don’t forget to tap the dish gently on the counter after pouring to remove air bubbles.
Chilling Time Non-Negotiable
The 4-hour minimum chilling time is sacred—no shortcuts! I’ve learned this the hard way with runny, sad pudding. For firmer layers, chill overnight. If you’re in a hurry, freeze for 2 hours max, but don’t overdo it or you’ll get ice crystals.
The layers should be firm enough to hold their shape when you run a knife around the edges before serving. 🍮
Nutrition facts
Frequently asked questions
Why does my Jell-O pudding turn out runny?
The most common cause is insufficient chilling time. This dessert needs at least 4 hours in the fridge to set properly. Another culprit could be too much liquid—stick to the exact measurements, especially when blooming the gelatin. If you're in a hurry, try freezing for 2 hours instead, but avoid over-freezing to prevent ice crystals.
Can I make this recipe without eggs?
For a vegan version, replace the 2 eggs with ½ cup silken tofu blended until completely smooth. The texture will be slightly different but still creamy. Just ensure your gelatin is properly bloomed and dissolved—this is even more critical without eggs to help stabilize the mixture.
How do I get those perfect wobbling layers?
The secret lies in the gelatin-to-pudding ratio and proper blooming. Use 2 tbsp unflavored gelatin per box of pudding mix, and always bloom it in cold water for 5 minutes before adding to the warm mixture. For extra-defined layers, strain the mixture through a fine-mesh sieve after whisking. Chill in an 8x8-inch dish for at least 4 hours—patience is key!
What's the best way to store leftovers?
Cover the pudding tightly with plastic wrap pressed directly on the surface to prevent a skin from forming. It keeps well in the fridge for up to 3 days. For longer storage, freeze individual portions in airtight containers for up to 1 month. Thaw overnight in the fridge before serving—never at room temperature.
Can I use different flavors of pudding mix?
Yes! Any instant pudding flavor works—try chocolate, lemon, or even strawberry for a fruity twist. Just note that darker flavors like chocolate may require slightly less gelatin (start with 1.5 tbsp) to maintain the wobble. For layered desserts, stick to complementary flavors like vanilla with berries or chocolate with whipped cream.